The short answer
Your correct distance from the ball is the one that lets your arms hang naturally under your shoulders while the club sits flat on the ground. That distance is different for every golfer and different for every club in the bag, because it is set by three things you cannot change on the range: how tall you are, how long your arms are, and how long the club is. A number that is right for a six foot four player with short arms is wrong for a five foot six player with long ones, which is why generic charts feel wrong when you try them.
So the useful question is not "how far should I stand". It is "how far should I stand, with this club". That has an exact answer, it can be measured in about ten minutes, and once you have it you can mark it on the shaft and stop thinking about it forever. The rest of this page is how.
Measure and set your address, start to finish.
The problem nobody teaches
Think about the last golf lesson you took, or the last one you watched. It was about the swing. The takeaway, the top, the transition, the follow through. Almost none of it was about the thing that happens before any of that, which is where you put your body in relation to the ball.
That is not an accident. Address position is unglamorous and it is different for every golfer, because it falls out of how tall you are and how long your arms are. A tip that works for a six foot four player with short arms is wrong for a five foot six player with long ones. So the advice you get is vague on purpose. Stand athletic. Let the arms hang. Bend from the hips. All true, none of it a number.
The result is that most golfers set up slightly differently every single time, and then spend the lesson fixing a swing that was compensating for the setup.
What the app works out
Advanced Golf Address asks for two measurements and nothing else.
- Your height. Shoes off, standing straight against a wall.
- Your wrist to floor. Standing straight with your arms hanging, the distance from the crease of your wrist to the ground.
From those two numbers and the length of each club you carry, it gives you three things per club: how far to stand from the ball, where the ball sits in your stance, and how wide to set your feet. Driver through wedge, including anything you had built long or short.

Why tape, and not a tape measure
Numbers on a screen are useless on the range. Nobody is going to kneel down with a tape measure before every shot, and if they did, they would still be measuring to a spot they picked by eye.
So the numbers go onto the club instead. Two pieces of tape on the shaft, put on once, carry the whole calculation. From then on the club tells you where to stand.
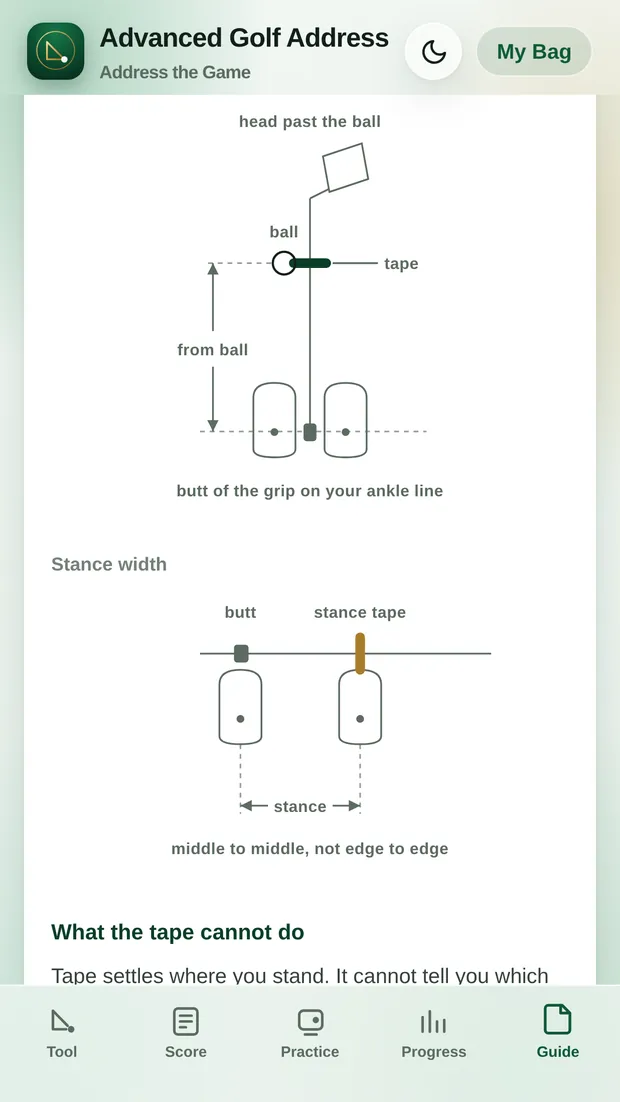
Tape one: how far you stand from the ball
Measured from the butt of the grip, this mark shows where the top of the club should sit relative to your ankle line when you are the right distance away. Set the club down behind the ball, take your stance so the mark lines up, and the distance is correct. Not close. Correct, for you and for that club.
Tape two: how wide you stand
The second mark gives your stance width for that club. Measure it middle of foot to middle of foot, never edge to edge. Edge to edge is where most stance advice quietly goes wrong, because two golfers in different shoes get different answers from the same instruction.
Mark the club, not the club you had last year
If you regrip, reshaft, or change a club's length, the old tape is void. The numbers were worked out for a specific club at a specific length. Re-mark it, or take the tape off. A mark you cannot trust is worse than no mark, because you will still set up to it.
What the tape cannot do
It is worth being straight about the limits, because a method that overclaims gets ignored the first time it is wrong.
The tape settles where you stand. It says nothing about where you are aimed. You can be at a perfect distance with a perfect stance width and be pointed thirty feet right of your target, and the tape will not object. That is a separate problem, and it is what the app's compass based aim tool is for.
The tape also does not swing the club. It gives you a repeatable place to start from, which is a foundation rather than a fix. What it buys you is that when something goes wrong, the setup is no longer one of the variables.
How to put the tape on
Putting the two pieces of tape on, club by club.
- Enter your height and wrist to floor in the app, once.
- Add your clubs. Standard lengths are already there, and you can override any club that was built long or short.
- Open a club and read its two numbers.
- Measure from the butt of the grip down the shaft and put the first piece of tape at the distance shown. Always from the butt, never from the head.
- Put the second piece of tape at the stance mark.
- Repeat for the clubs you actually use. Most golfers do the driver, a mid iron and a wedge first, and fill in the rest later.
Any tape works. Electrical tape is easiest to see against a dark shaft and comes off cleanly.
Using it on the range
Put the club down behind the ball. Take your stance so the shaft mark sits on your ankle line, and set your feet to the stance mark. That is address. It should feel slightly unfamiliar for the first few sessions, which is the point, because familiar was the thing that was different every time.
Then, if you want the second half of it, lay the phone along your toes and let the aim tool tell you whether you are square to your line before you hit.
